| .idea | ||
| fanuc_licenses | ||
| imgs | ||
| ros1_noetic_core | ||
| ros2_basic_demo_gui/fanuc_control_panel | ||
| ros2_fanuc_web_connector/fanuc_web_connector | ||
| ros2_foxy_core | ||
| ros2_humble_crx_description/fanuc_crx_description | ||
| README.md | ||
CPS Hub: Fanuc CRX-10iA Framework
Installation of the core packages
The following software needed to be installed on the Intel NUC:
- Ubuntu 20.04
- ROS-1 Noetic (from binaries)
- ROS-2 Foxy (from source) including a separate initialization of the ROS-1 Bridge
- Fanuc ROS-1 Interface (Fanuc Driver)
ROS-1 Noetic
The installation of ROS-1 Noetic is the most convenient option as it can be done using binaries. The following steps need to be executed in a bash terminal:
sudo sh -c 'echo "deb http://packages.ros.org/ros/ubuntu $(lsb_release -sc) main" > /etc/apt/sources.list.d/ros-latest.list'

sudo apt install curl

curl -s https://raw.githubusercontent.com/ros/rosdistro/master/ros.asc | sudo apt-key add -

sudo apt update

sudo apt install ros-noetic-desktop-full
To use ROS-1 in a bash terminal, the setup file must be sourced. This must be done in each new bash terminal window.
source /opt/ros/noetic/setup.bash
ROS-2 Foxy
Installing ROS-2 Foxy requires more steps because it needs to be installed from source. This installation method is necessary to set up the ROS-1 Bridge for custom message types. The following steps must be followed in a bash terminal:
sudo apt update && sudo apt install locales
sudo locale-gen en_US en_US.UTF-8
sudo update-locale LC_ALL=en_US.UTF-8 LANG=en_US.UTF-8
export LANG=en_US.UTF-8

sudo apt install software-properties-common
sudo add-apt-repository universe

sudo apt update && sudo apt install curl -y
sudo curl -sSL https://raw.githubusercontent.com/ros/rosdistro/master/ros.key -o /usr/share/keyrings/ros-archive-keyring.gpg

echo "deb [arch=$(dpkg --print-architecture) signed-by=/usr/share/keyrings/ros-archive-keyring.gpg] http://packages.ros.org/ros2/ubuntu $(. /etc/os-release && echo $UBUNTU_CODENAME) main" | sudo tee /etc/apt/sources.list.d/ros2.list > /dev/null

sudo apt update && sudo apt install -y libbullet-dev python3-pip python3-pytest-cov ros-dev-tools
python3 -m pip install -U argcomplete flake8-blind-except flake8-builtins flake8-class-newline flake8-comprehensions flake8-deprecated flake8-docstrings flake8-import-order flake8-quotes pytest-repeat pytest-rerunfailures pytest
sudo apt install --no-install-recommends -y libasio-dev libtinyxml2-dev
sudo apt install --no-install-recommends -y libcunit1-dev

mkdir -p ~/ros2_foxy/src
cd ~/ros2_foxy
vcs import --input https://raw.githubusercontent.com/ros2/ros2/foxy/ros2.repos src

sudo apt upgrade

sudo rosdep init
rosdep update
rosdep install --from-paths src --ignore-src -y --skip-keys "fastcdr rti-connext-dds-5.3.1 urdfdom_headers"

cd ~/ros2_foxy/
colcon build --symlink-install
In any bash terminal, the ROS-2 setup file must be sourced if you intend to use ROS-2.
$ source ~/ros2_foxy/install/local_setup.bash
Overlay Workspaces
To install the additional packages, overlay workspaces are needed.
source /path/to/noetic/setup.bash
cd ~

mkdir <name of ros1 overlay ws>
cd <name of ros1 overlay ws>
mkdir src

catkin_make
In another bash terminal:
source /path/to/foxy/setup.bash
cd ~

mkdir <name of ros2 overlay ws>
cd <name of ros2 overlay ws>
mkdir src

colcon build
Now you can place the ROS-1 and ROS-2 core packages from this repository into the "src" directories of the overlay workspaces:
- ros1_noetic_core (into the ROS-1 overlay workspace folder on the NUC):
- fanuc_msg_translator
- fanuc_msg_translator_msgs
- ros2_foxy_core (into the ROS-2 overlay workspace folder on the NUC):
- fanuc_crx_description
- fanuc_msg_translator_msgs
CAVE: all python files have to be made executable:
cd path/to/python/file/in/the/package
chmod +x <name of the python file>
Fanuc ROS-1 Interface
The Fanuc ROS-1 Interface package can be acquired by requesting it from Fanuc's Technical Support. Fanuc's Technical Support will provide a folder containing the pre-built ROS-1 package along with a short documentation.
The zip package containing the Fanuc ROS-1 Interface must be extracted and placed in the file system. It is common to place it in the user's folder.
Before installing the Fanuc ROS-1 Interface, it is advisable to create a ROS-1 workspace if one does not already exist. The following bash code demonstrates how to create this workspace in the user's home directory:
source /opt/ros/noetic/setup.bash

cd ~
mkdir <name of the workspace folder>

cd <name of the workspace folder>
mkdir src

catkin_make
For the installation process, the following steps need to be executed in a bash terminal:
sudo apt install ros-noetic-industrial-msgs
sudo apt install ros-noetic-rviz

sudo apt install libmodbus-dev libjsoncpp-dev lshw

chmod u+x path/to/fanuc/ros/driver/lib/fanuc_ros_driver/*_node
chmod u+x path/to/fanuc/ros/driver/_setup_util.py

source path/to/fanuc/ros/driver/setup.bash

cd path/to/your/ROS1/workspace
rm -rf devel build
catkin_make
source devel/setup.bash
Running these commands will install the Fanuc ROS-1 interface. However, the license is still missing. Therefore, a file containing the hardware information of the computer must be sent to Fanuc's technical support.
To create a hardware information file, the following commands need to be executed in a bash terminal:
roslaunch fanuc_ros_driver fanuc_interface.launch create_license:=true
Once the license file from technical support is received, the Fanuc ROS-1 Interface can be launched using the following steps:
roslaunch fanuc_ros_driver fanuc_interface.launch ip:="robot ip address" robot_type:="CRX-10iA" license:="path to license.data"
ROS-1 Bridge
CAVE: Before installing the ROS-1 Bridge, the core packages from this repository must be placed into the correct workspaces (and the workspaces have to be built with catkin for ROS-1 and colcon for ROS-2).
The installation files for the ROS-1 Bridge are already included in the ROS-2 distribution repository. To initialize the ROS-1 Bridge, the following steps need to be executed in a bash terminal:
cd ~/ros2_foxy

colcon build --symlink-install --packages-skip ros1_bridge

source path/to/ros1/workspace/install/setup.bash
source path/to/ros2/workspace/install/setup.bash

source path/to/ros1/overlay/workspace/install/setup.bash
source path/to/ros2/overlay/workspace/install/local_setup.bash

colcon build --symlink-install --packages-select ros1_bridge --cmake-force-configure
License Path
At this step, the core packages from this repository should already be installed. Now, the static path of the license should be written into the FANUC_LICENSE environment variable. This can be permanently done by adding the export statement to the .bashrc file.
echo 'export FANUC_LICENSE="/absolute/path/to/license.data" ' >> ~/.bashrc
Launching the Interface
ROS-1 fanuc_msg_translator Package
Depending on the use case following launch files are available:
- fanuc_1.launch
- fanuc_2.launch
- fanuc_pair.launch (launches the nodes for the operation of both robots on the same NUC)
Example:
source /path/to/ros_1_overlay_ws/devel/setup.bash

roslaunch fanuc_msg_translator fanuc_1.launch
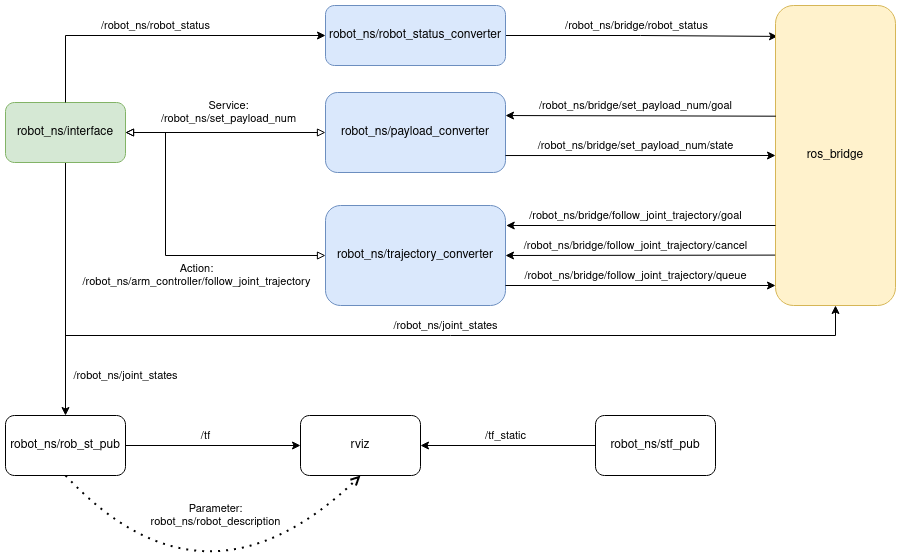
These launch files launch all the nodes seen in this figure, including the parameter for the ROS-1 Bridge:
ROS-2 ros1-bridge Package
To enable communication between ROS-1 and ROS-2
source /path/to/ros_2_overlay_ws/install/setup.bash

ros2 run ros1_bridge parameter_bridge
ROS-2 fanuc_crx_descripton Package
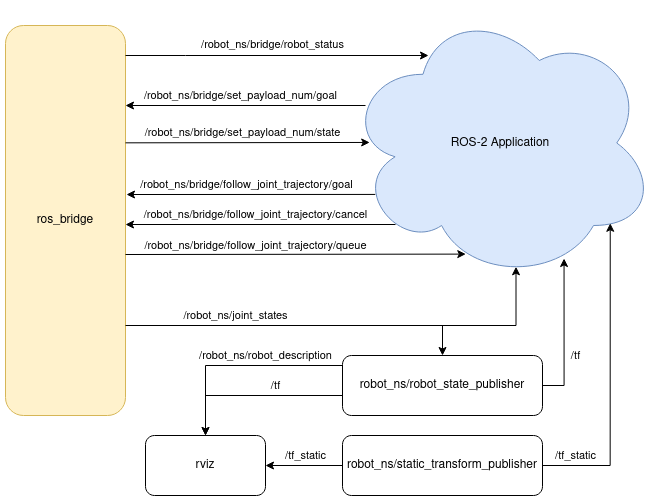
In ROS 1, the visualization cannot be directly bridged to ROS 2. As a result, the robot_state_publisher and some other nodes have to be launched separately in ROS 2. Additionally, the /tf and /tf_static topics are not bridged, allowing ROS 2 nodes to create them without encountering any complications. The following launch files can be launched:
- fanuc_1.launch.py
- fanuc_2.launch.py
source /path/to/ros_2_overlay_ws/install/setup.bash

ros2 launch fanuc_crx_description fanuc_1.launch.py
The following figure shows the node structure in ROS-2:
Functionality of the Interface
Once the interface is launched, it offers the following functions.
Joint States
The current joint state values of the robot can be received from the <robot_name_space>/joint_states topic.
Robot Status
The current robot status can be be received from the <robot_name_space>/robot_status topic. The custom message type has the following message file (fanuc_msg_translator_msgs package: FanucRobotStatus.msg):
std_msgs/Header header

fanuc_msg_translator_msgs/FanucRobotStatusTriState tp_enabled

fanuc_msg_translator_msgs/FanucRobotStatusTriState e_stopped

fanuc_msg_translator_msgs/FanucRobotStatusTriState drives_powered

fanuc_msg_translator_msgs/FanucRobotStatusTriState motion_possible

fanuc_msg_translator_msgs/FanucRobotStatusTriState in_motion

fanuc_msg_translator_msgs/FanucRobotStatusTriState in_error

int32 error_code
It uses the following message type, which is also defined in the same package (fanuc_msg_translator_msgs package: FanucRobotStatusTriState.msg):
int8 val

# enumerated values

# Unknown or unavailable
int8 UNKNOWN=-1

# High state
int8 TRUE=1
int8 ON=1
int8 ENABLED=1
int8 HIGH=1
int8 CLOSED=1

# Low state
int8 FALSE=0
int8 OFF=0
int8 DISABLED=0
int8 LOW=0
int8 OPEN=0
Set Payload
To set a predefined payload, a message of the following message type has to be sent to the <robot_name_space>/bridge/set_payload_num/goal topic (fanuc_msg_translator_msgs package: FanucPayloadStatus.msg).
std_msgs/Header header

int16 payload_num
Get the current Payload Number
The last set payload number is periodically published to the <robot_name_space>/bridge/set_payload_num/state topic (fanuc_msg_translator_msgs package: FanucPayloadStatus.msg).
std_msgs/Header header

int16 payload_num
Send Trajectory
A goal trajectory has to be sent to the <robot_name_space>/bridge/follow_joint_trajectory/goal topic. It uses the JointTrajectory message type from the trajectory_msgs package.
Trajectory Queue
The trajectories, which are waiting for execution, are shown in the <robot_name_space>/bridge/follow_joint_trajectory/queue topic, which periodically publishes messages of the following message type (fanuc_msg_translator_msgs package: FanucTrajectoryConverterQueue.msg):
std_msgs/Header header

fanuc_msg_translator_msgs/FanucTrajectoryConverterQueueItem[] goals
It uses the following message type, which is also defined in the same package (fanuc_msg_translator_msgs package: FanucTrajectoryConverterQueueItem.msg):
builtin_interfaces/Time received_time_stamp

int16 status_in_queue

int16 status_on_server
The received_time_stamp is the unique id of every trajectory in the queue. It is the time stamp from the header of the trajectory message received via the <robot_name_space>/bridge/follow_joint_trajectory/goal topic.
The status in the queue is:
- 0 if the trajectory is waiting
- 1 if the trajectory is currently executed
- 100 to 130 if the trajectory is finished (counter until 130, afterward it is removed from the queue topic)
The status on the server is:
- -1 if the trajectory is waiting or currently executed
- one of the following values from the original message type (action server of the Fanuc ROS Driver) after the trajectory is finished or aborted.
From: http://docs.ros.org/en/api/actionlib_msgs/html/msg/GoalStatus.html
 GoalID goal_id
uint8 status
uint8 PENDING         = 0   # The goal has yet to be processed by the action server
uint8 ACTIVE          = 1   # The goal is currently being processed by the action server
uint8 PREEMPTED       = 2   # The goal received a cancel request after it started executing
                            #   and has since completed its execution (Terminal State)
uint8 SUCCEEDED       = 3   # The goal was achieved successfully by the action server (Terminal State)
uint8 ABORTED         = 4   # The goal was aborted during execution by the action server due
                            #    to some failure (Terminal State)
uint8 REJECTED        = 5   # The goal was rejected by the action server without being processed,
                            #    because the goal was unattainable or invalid (Terminal State)
uint8 PREEMPTING      = 6   # The goal received a cancel request after it started executing
                            #    and has not yet completed execution
uint8 RECALLING       = 7   # The goal received a cancel request before it started executing,
                            #    but the action server has not yet confirmed that the goal is canceled
uint8 RECALLED        = 8   # The goal received a cancel request before it started executing
                            #    and was successfully cancelled (Terminal State)
uint8 LOST            = 9   # An action client can determine that a goal is LOST. This should not be
                            #    sent over the wire by an action server
Cancel Trajectory
A trajectory can be canceled by sending of the following type to the <robot_name_space>/bridge/follow_joint_trajectory/cancel topic (fanuc_msg_translator_msgs package: FanucTrajectoryConverterCancel.msg).
std_msgs/Header header

builtin_interfaces/Time received_time_stamp
Operation Modes
IP Configuration
The following static IP addresses are assigned:
- Fanuc 1: 192.168.1.201
- Fanuc 2: 192.168.1.206
- NUC 1: 192.168.1.202
- NUC 2: 192.168.1.207
If the IP addresses of the robot controllers are changed, the IP addresses have to be changed in following package:
- Workspace: ROS-1 Overlay
- Package: fanuc_msg_translator
- Config Files: params_fanuc_1.yaml and params_fanuc_2.yaml
Modularity
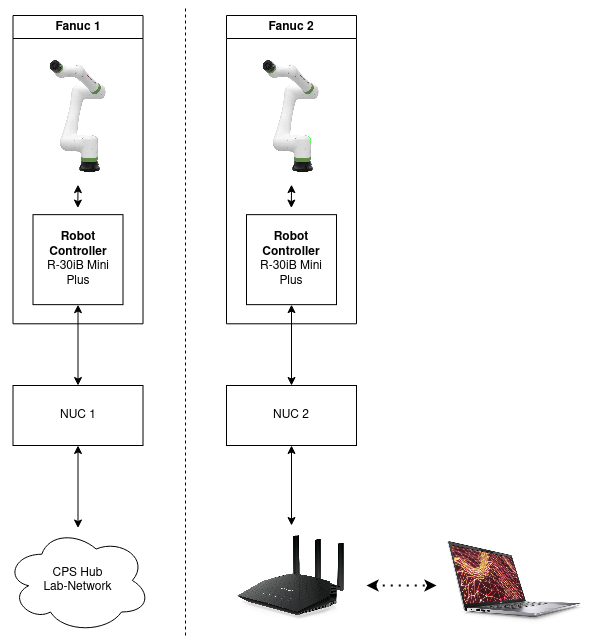
Because of the static IPs and the Fanuc Robots and the NUCs can be used flexibly:
- 1 Robot - 1 NUC
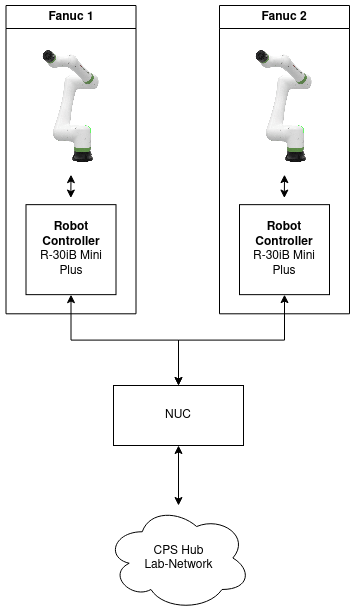
- 2 Robots - 1 NUC
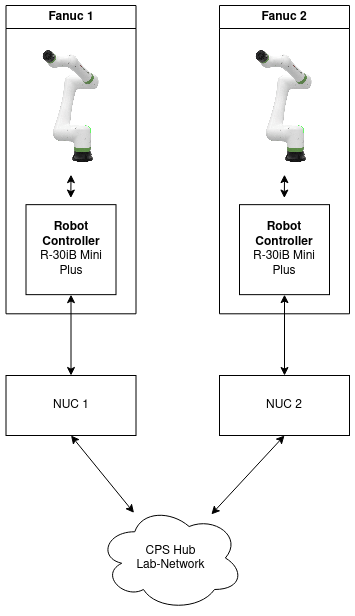
- 2 Robots - 2 NUCs (in the same network, e.g. CPS-HUB)
- 2 Robots - 2 NUCs (in different networks --> mobile router must be configured identically to the CPS Laboratory networks router)
ROS-2 Network control
To use to Fanuc ROS-2 Interface from another computer than the NUC, the message types need to be installed to ROS-2. Therefore copy the fanuc_msg_translator_msgs package from the ros2_foxy_core folder of this repository into the overlay workspace on any other machine and install it with colcon build.
RViz
The /tf and the /robot_description topics are published by the nodes launched in the procedure shown above. If you want to use RViz on another computer in the same network, make sure the fanuc_crx_description is installed in the local overlay workspace. If ROS-2 Humble is used on the computer,the fanuc_crx_description package from the folder "ros2_humble_crx_description" can be utilized. If ROS-2 Foxy is used, please use the package with the same name from the "ros2_foxy_core" folder, because ROS-2 Foxy has issues compiling the xacro (urdf) files.
You can start rviz with:
source /path/to/ROS-2/setup.bash

rviz2
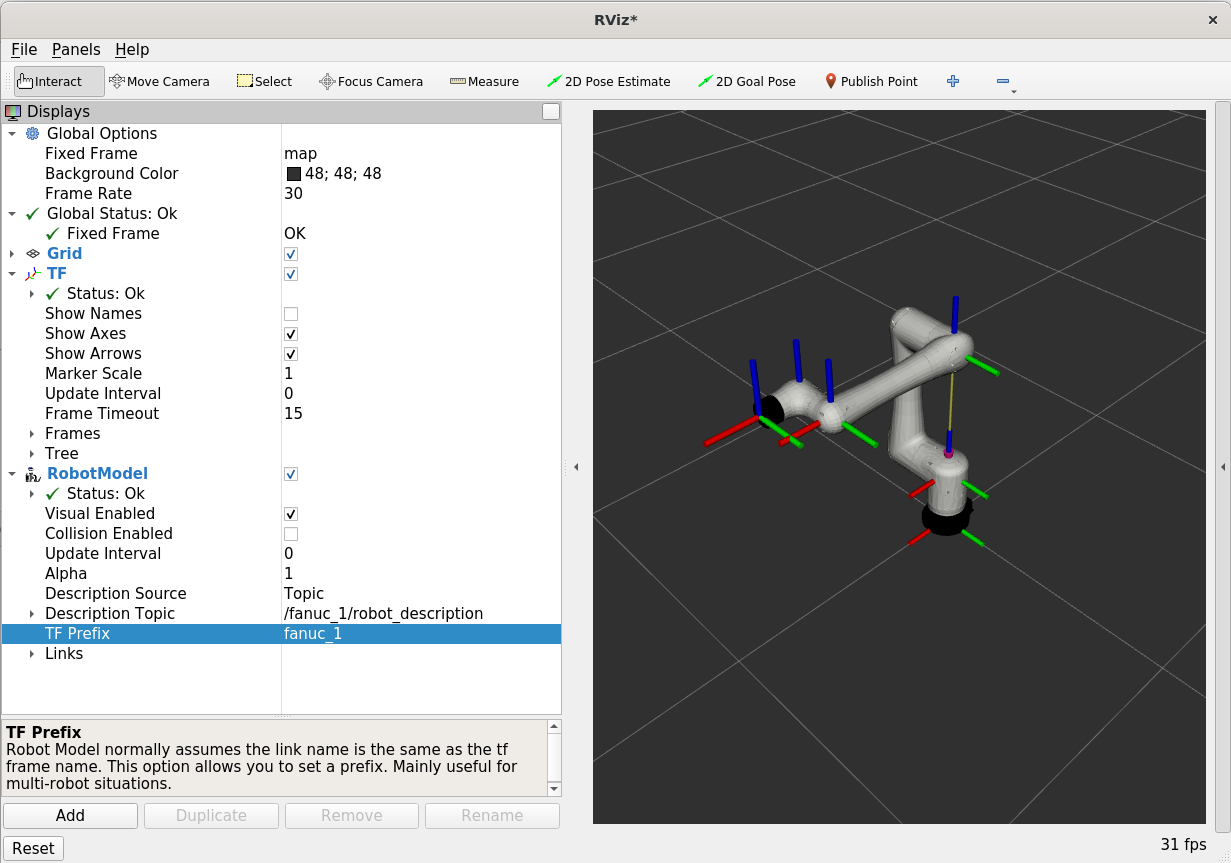
To visualize the transformation of the frames click "add" --> "TF". To show the whole model of the robot click "add" --> "RobotModel".
TF and RobotModel should be shown in the tree structure on the left side of RViz. Make sure following settings are made for the RobotModel:
- Description Topic: /<robot_name_space>/robot_description
- TF Prefix: <robot_name_space>
